If you’re looking for diverse scenery and amazing hiking, a road trip to Utah’s National Parks may just be the perfect vacation for you. Utah has five absolutely stunning national parks for you to explore- Zion, Bryce Canyon, Capitol Reef, Arches and Canyonlands- and, given that it only takes seven hours to drive from Zion in Utah’s southwest corner to Arches all the way in the southeast, it’s a trip you could reasonably squeeze in just a week’s span.
My husband, Justin, and I took a fantastic Utah road trip to all of its national parks in this period of time and picked up some great tips and tricks about planning a visit along the way. So if you, too, are planning a road trip through the National Parks of Utah, keep on reading below for everything you need to know- from when to go, where to stay, and what to see in each of the National Parks!
This post may contain affiliate links. If you make a purchase through them, we may receive a small commission, for which we are extremely grateful, at no extra cost to you.

")
When to plan a road trip through the National Parks in Utah
While Utah’s National Parks (sometimes called the Mighty 5) are busiest from May through September, they can be great to explore most of the year.
Spring (April through May) is a lovely time to visit, with warm, sunny weather and blooming wildflowers, but a chance to still catch some snow at higher elevations.
Summer is a popular season due to school breaks, but if you can schedule your visit during another time, I’d highly recommend it- daytime temperatures are consistently above 100° F, with the heat making it uncomfortable (and sometimes, even dangerous) to hike outside.

The fall (September and October) provides perfect hiking weather (mid-60s to low-70s), less crowds, and cheaper accommodations. We scheduled our road trip in September and I’d say it’s the perfect time to visit!
While winter can get quite literally freezing (with daytime temperatures in the 30-50s), the landscape can feel a bit magical with the addition of snow and it’ll be significantly less crowded than other times of the year. So if you don’t mind bundling up, winter in Utah can be awesome for a road trip!
Where to start a road trip through Utah’s National Parks
Justin and I road tripped from our home in Seattle and drove through Salt Lake City down to Zion and on to the other national parks.

If it would be too far of a drive from your home state, you will have to fly either into Las Vegas, Nevada or Salt Lake City, Utah. If you plan on driving from Las Vegas on to Zion through Arches and back again, the total round trip drive time is about 16 hours.
You can shave off about an hour by flying in and out of Salt Lake City (round trip drive time: around 15 hours) and even more if you fly into Vegas (starting in Zion) and out of Salt Lake City or vice versa (i.e., flying into Salt Lake City and starting in Arches/Canyonlands and flying out of Vegas), with a total drive time of a little over thirteen hours.
Remember, though, if you rent a car, it’ll cost quite a bit more (sometimes hundreds of dollars!) to drop a rental off at a different place than you picked it up, so you’ll have to ask yourself if an extra three hours of drive time spread over a week is worth the additional expense.
And if you’re trying to choose between flying in and out of Vegas or Salt Lake City, I’d probably recommend picking Vegas. You’re much more likely to find cheap flights there (I score the best deals on flights using Skyscanner), plus you can enjoy the glittery, kitschy ridiculousness that is Vegas!
That being said, there are some very cool pitstops that you can make on your road trip if you start in Salt Lake City, like Fifth Water Hot Springs (which is just a short detour when you’re driving between the city and national parks in Moab) or Meadow Hot Springs (which is just a short detours when you’re driving between the city and Zion).
How to get around during a road trip through Utah’s National Parks
Hopefully this is obvious, but there’s one thing you definitely need for a road trip- a vehicle! As mentioned above, if you’re flying in, you’ll need to rent a car (or RV)- most of the roads around the state and in Utah’s national parks are well-paved and do not require 4WD or high clearance.
Note that there are a few activities in Utah’s national parks where having a high clearance vehicle is required, like visiting the Temple of the Sun and the Moon in Capitol Reef or exploring the Maze district in Canyonlands. I don’t cover those activities in this post, but if you’re interested in off-roading, you can read about them in our posts about Capitol Reef and Canyonlands.

And if you’re a fellow RVer, like me, you’re in luck- the American Southwest was basically BUILT for RVers. There’s tons of awesome free campsites near all of the national parks (or established ones with hook-ups, if that’s your jam!), making it super easy to explore the National Parks in Utah with an RV.
Suggested itinerary for a road trip to Utah’s National Parks
In a perfect world, you’d be able to spend at least two days in each national park, with some leisurely drive time between the parks and even some downtime for side trips.
Since most people (or at least, most non-retired Americans, including myself) have limited time off of work, I’m going to assume you’ll only have a week for this trip. And while I’ve included some recommendations below for things to see along the way if you happen to have extra time, you can absolutely have a great experience exploring the Mighty 5 in only a week- you’re just going to be pretty pooped after your action-packed week exploring Utah!

For the purposes of this itinerary, I’m going to assume you’re starting your road trip in Vegas, with Zion National Park as your first stop, but note that, if your road trip starts from Salt Lake City instead, you can similarly start in Zion (i.e., it won’t add any extra driving time for you whether you start in Zion or Arches/Canyonlands).
Day 1: Drive from Vegas to Zion (drive time: 2 hours and 34 minutes)
Day 2: Zion National Park
Day 3: Zion National Park to Bryce Canyon (drive time: 1 hour and 51 minutes)
Day 4: Bryce Canyon to Capitol Reef (drive time: 2 hours and 10 minutes)
Day 5: Capitol Reef to Moab (drive time: 2 hours and 10 minutes)
Day 6: Arches
Day 7: Canyonlands and back to Vegas (drive time: 6 hours and 45 minutes)
See, I told you to plan for an action-packed week!

Day 1: Drive from Vegas to Zion
1. Fly into Las Vegas
You’ll start your trip by flying into Vegas, known for its extravagant and kitschy casinos, bumping nightlife, and electric energy. If you happen to have a few extra days to tack on to your trip, I think exploring Vegas is 100% worth it (spoiler alert, I LOVE Vegas!).
If you’ve got extra vacation days to play with, I’d recommend tacking on your Vegas days at the end of the trip as a reprieve from your “go, go, go” time exploring the national parks, so I’ve included some recommendations of what to see and do around Vegas in Day 7 below.
2. Drive to Zion National Park
For now, pick up your rental car and make the two and a half hour drive to Zion National Park, where you’ll spend the next 48 hours. Zion, home to towering canyon walls, abundant wildlife, and world class hiking, is one of the most beautiful U.S. National Parks. It does, however, have some quirky transit and parking limitations that can make it a bit challenging to maneuver.
I’m not going to go into too much detail about each of the Mighty 5, so this article isn’t 100 pages long, but I have a more detailed post for each of them (with all the information you need from how to get around to more detailed hike descriptions), including a guide for 2 days in Zion National Park.

3. Watch sunset in Zion
For your first afternoon, I’d recommend doing a low-key activity, like hiking the flat 3.4-mile out-and-back Pa’rus Trail along the Virgin River to Canyon Junction Bridge. This is one of the best spots in the park to watch the sunset and see the spectacular changing colors on the canyon walls.
4. Get dinner in Springdale
Afterwards, grab dinner in Springdale, the adorable town bordering Zion’s south entrance.

Hotels Near Zion National Park:
- Driftwood Lodge: Provides great views of Zion’s red rocks and offers a pool AND a little riverside beach!
- Flanigan’s Inn: Located only 0.6 miles from the entrance of Zion, this is a great option for those looking for a slightly more upscale experience (with both a spa and salon onsite, oh la la).
- 2 Cranes Inn: If you’d prefer more affordable accommodations, you could check out this hotel, located in the nearby town of Rockville (only 18 minutes from Zion’s entrance).
Camping Near Zion National Park:
- In terms of free dispersed camping, there’s tons of great Bureau of Land Management land near the park, like Dalton Wash Road,Smithsonian Butte Dispersed Camping, or Zion Scenic Byway.
- If you’d like a bit more amenities (like, say, those fancy toilets that flush), consider instead the South Campground ($20 for an individual site) or the Watchman Campground ($20 for an individual site, $30 for a site with electric hookups), which are both located inside Zion. Like anything else around here, be sure to secure reservations in advance.
Places to Eat Near Zion National Park:
- Zion Brewery: Simple bar food, like burgers, with a Southwestern flair and some really good microbrews (perfect for a post-hike beer!).
- Oscar’s Cafe: Dishes up Tex-Mex and Southwestern comfort food in a casual open-air setting.
- Bit & Spur: Yet another restaurant serving up Tex-Mex and some seriously tasty margaritas (obviously, very important).

Day 2: Zion National Park
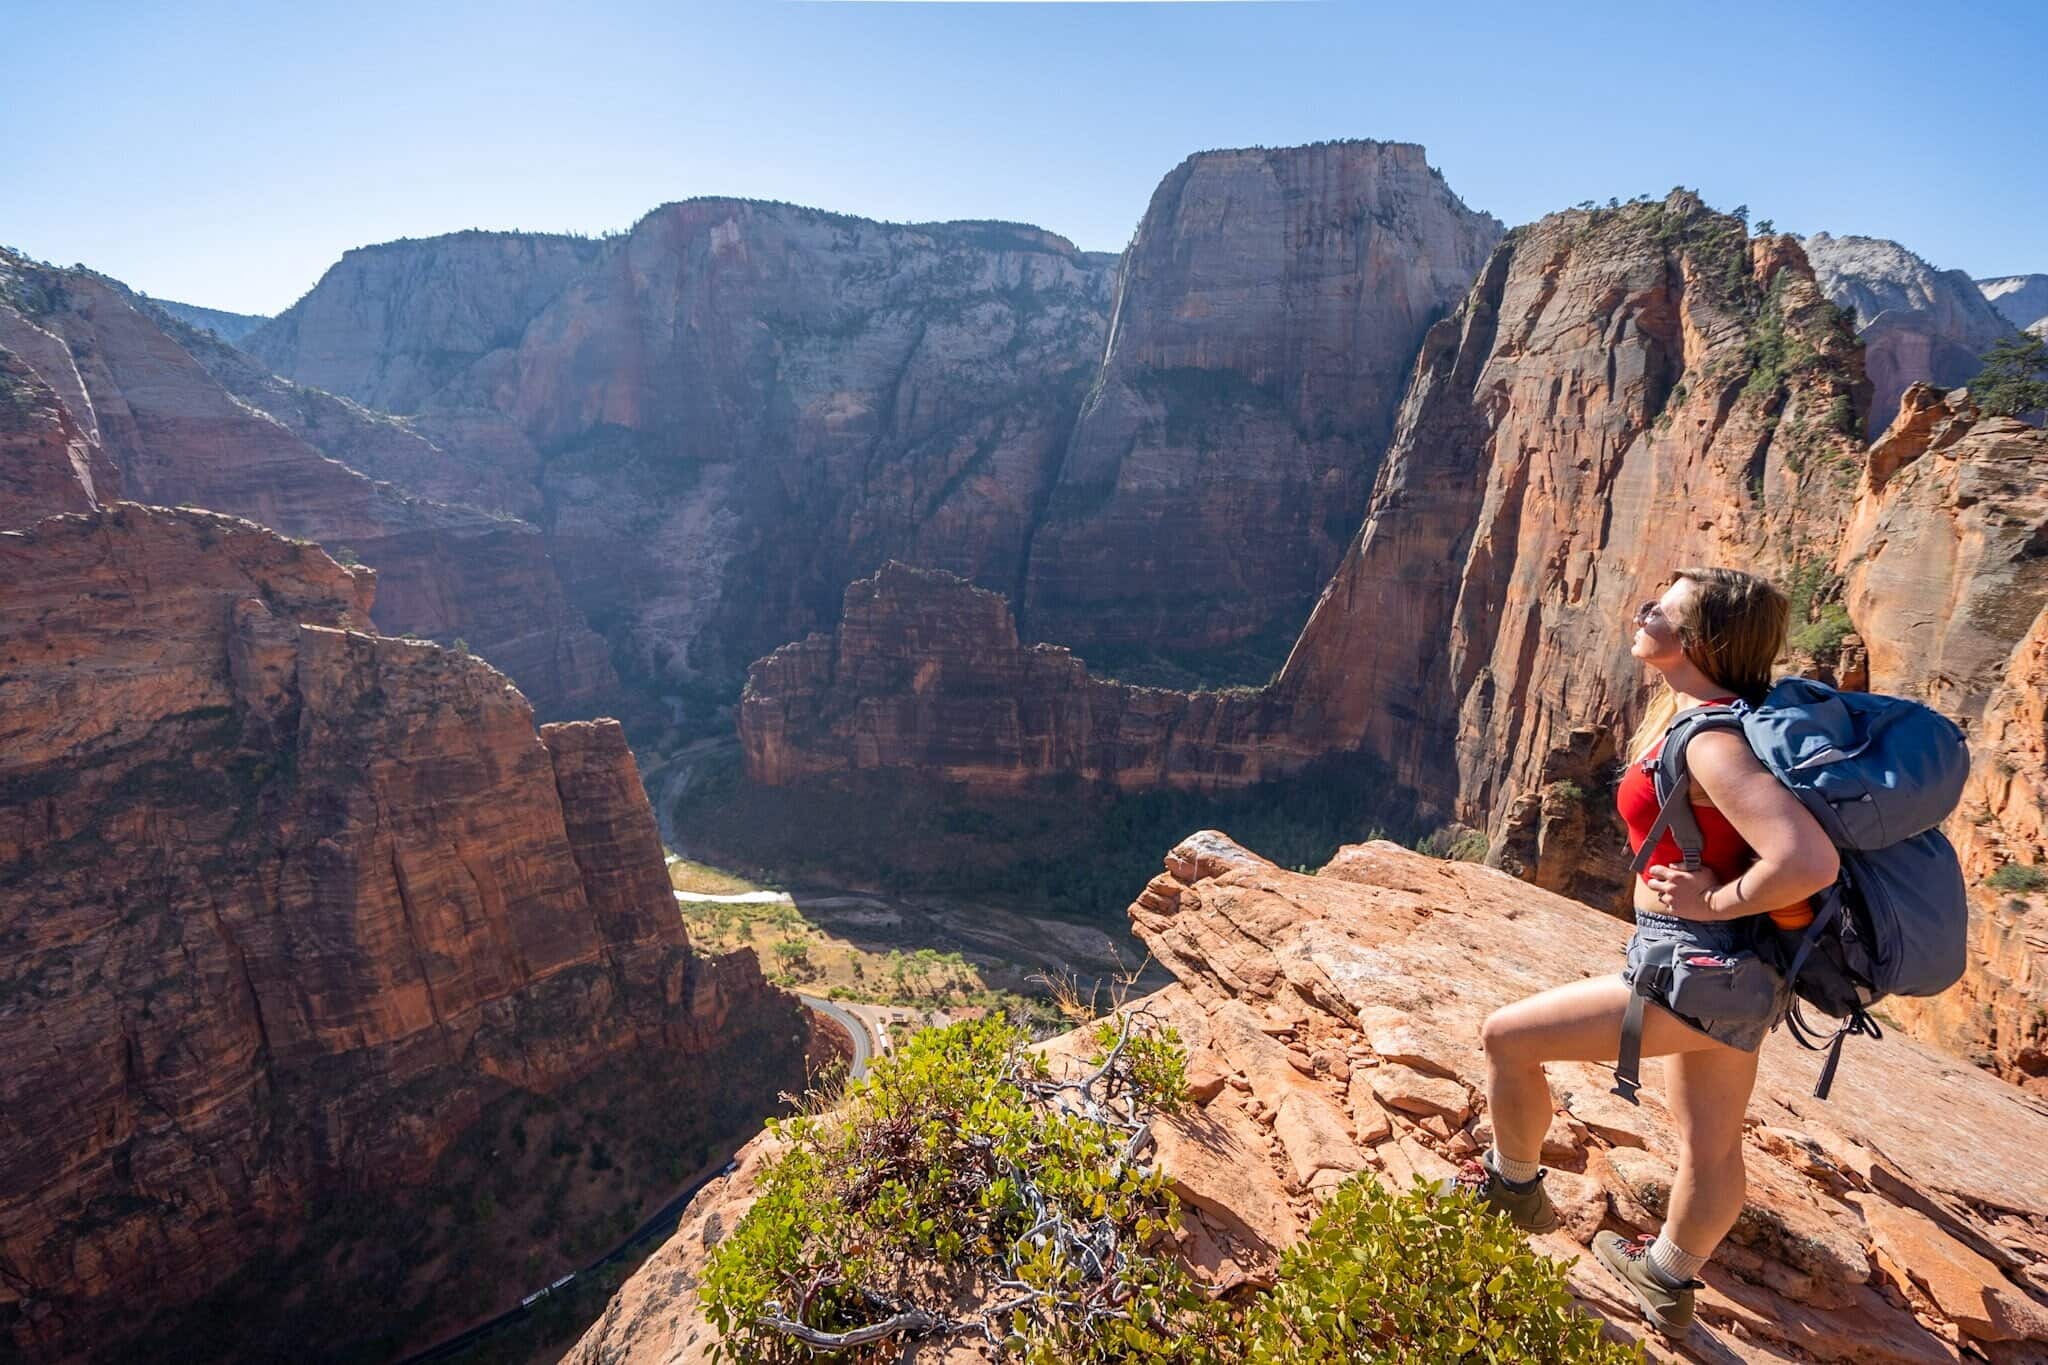
1. Hike the Scout Lookout Trail (plus the add-on to Angel’s Landing, if you’re a brave soul!)
Start your first full day in Zion with a moderate to challenging 3.6-mile out-and-back trail to Scout Lookout, with the optional half-mile extension along the harrowing Angel’s Landing along the impossibly narrow spine of a mountain, if you’re brave enough (I’m not!). Both trails are along Zion Canyon’s West Rim and provide breathtaking vistas of the canyon below.
To hike the Angel’s Landing trail, it’s worth noting that you’ll need to get a permit ahead of time, which you can learn more about on the National Park Service website.

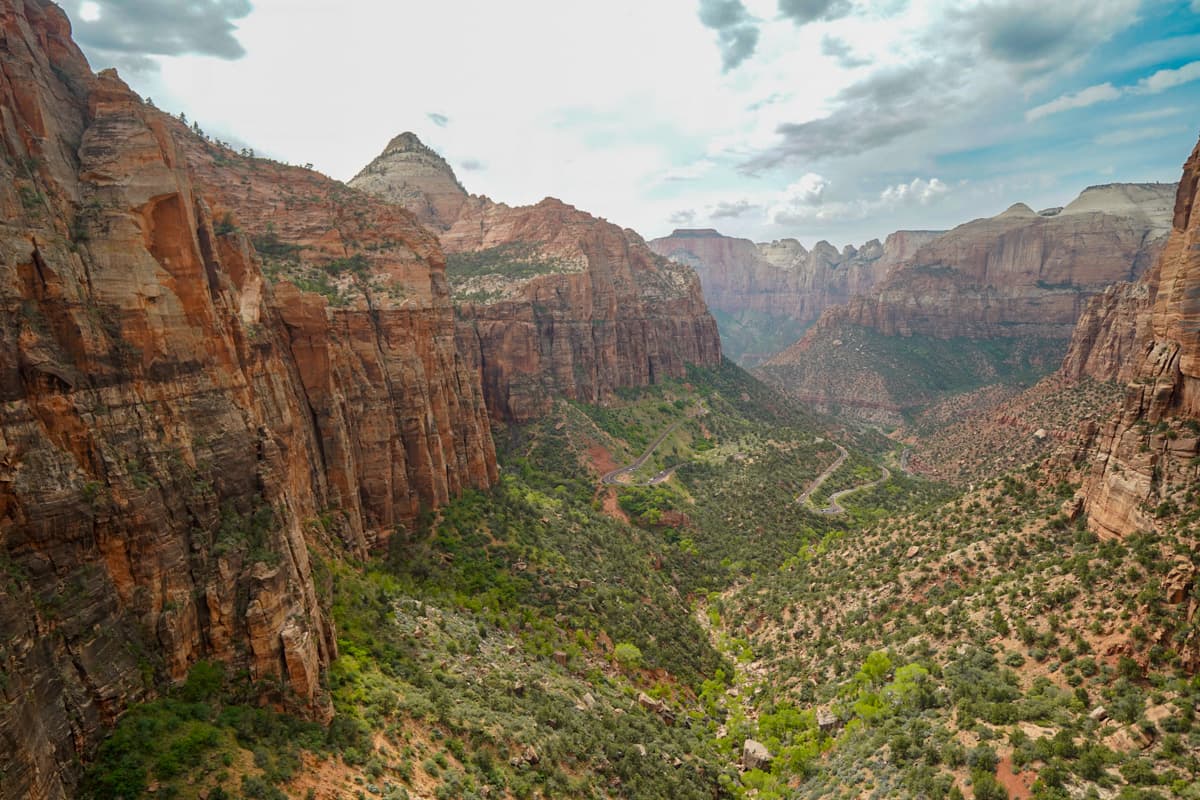
2. Hike the Canyon Overlook Trail
Drive to and hike the Canyon Overlook Trail, a flat (150 feet elevation gain) one-mile round trip trek to a viewpoint overlooking the canyon, with spectacular views of the Pine Creek slot canyon and the switchbacks of Highway 9 below.
Canyon Overlook is the shortest trail in the park that offers a viewpoint above the canyon, so it’s an excellent option for travelers with children or beginner hikers and also a great place to see wildlife (i.e., new bighorn sheep friends!). We actually spent about an hour, sitting on a rock here, just watching a bighorn sheep munch on some shrubs!
3. Watch sunset and stargaze along the Watchman Trail
When it’s an hour or two before sunset, hit up your last trail of the day- the moderately challenging Watchman Trail. The three-mile round trip hike will take you to a viewpoint along the canyon rim, where you can watch the sun sink below Zion’s walls and create dazzling colors on the Watchman, an unmistakable towering mountain over the park.
While this spot is one of the best places to see sunset in the park, wait around for about half an hour or so afterwards to stargaze here. I’ve never experienced such amazing stargazing- or such a brilliantly visible Milky Way- as I have in Zion.

Day 3: Zion National Park to Bryce Canyon
1. Hike The Narrows
If you are trying to hit all the big bucket list hikes in Zion, the Narrows will almost certainly be on your agenda. It’s arguably the most famous hike in the park, taking you for miles literally through the Virgin River down the narrowest part of Zion Canyon.
The Narrows is kind of like a choose-your-own-adventure. You can elect to hike the entire 10 miles of the hike or alternatively, only go as far along the trail as the start of the river (2 miles roundtrip).
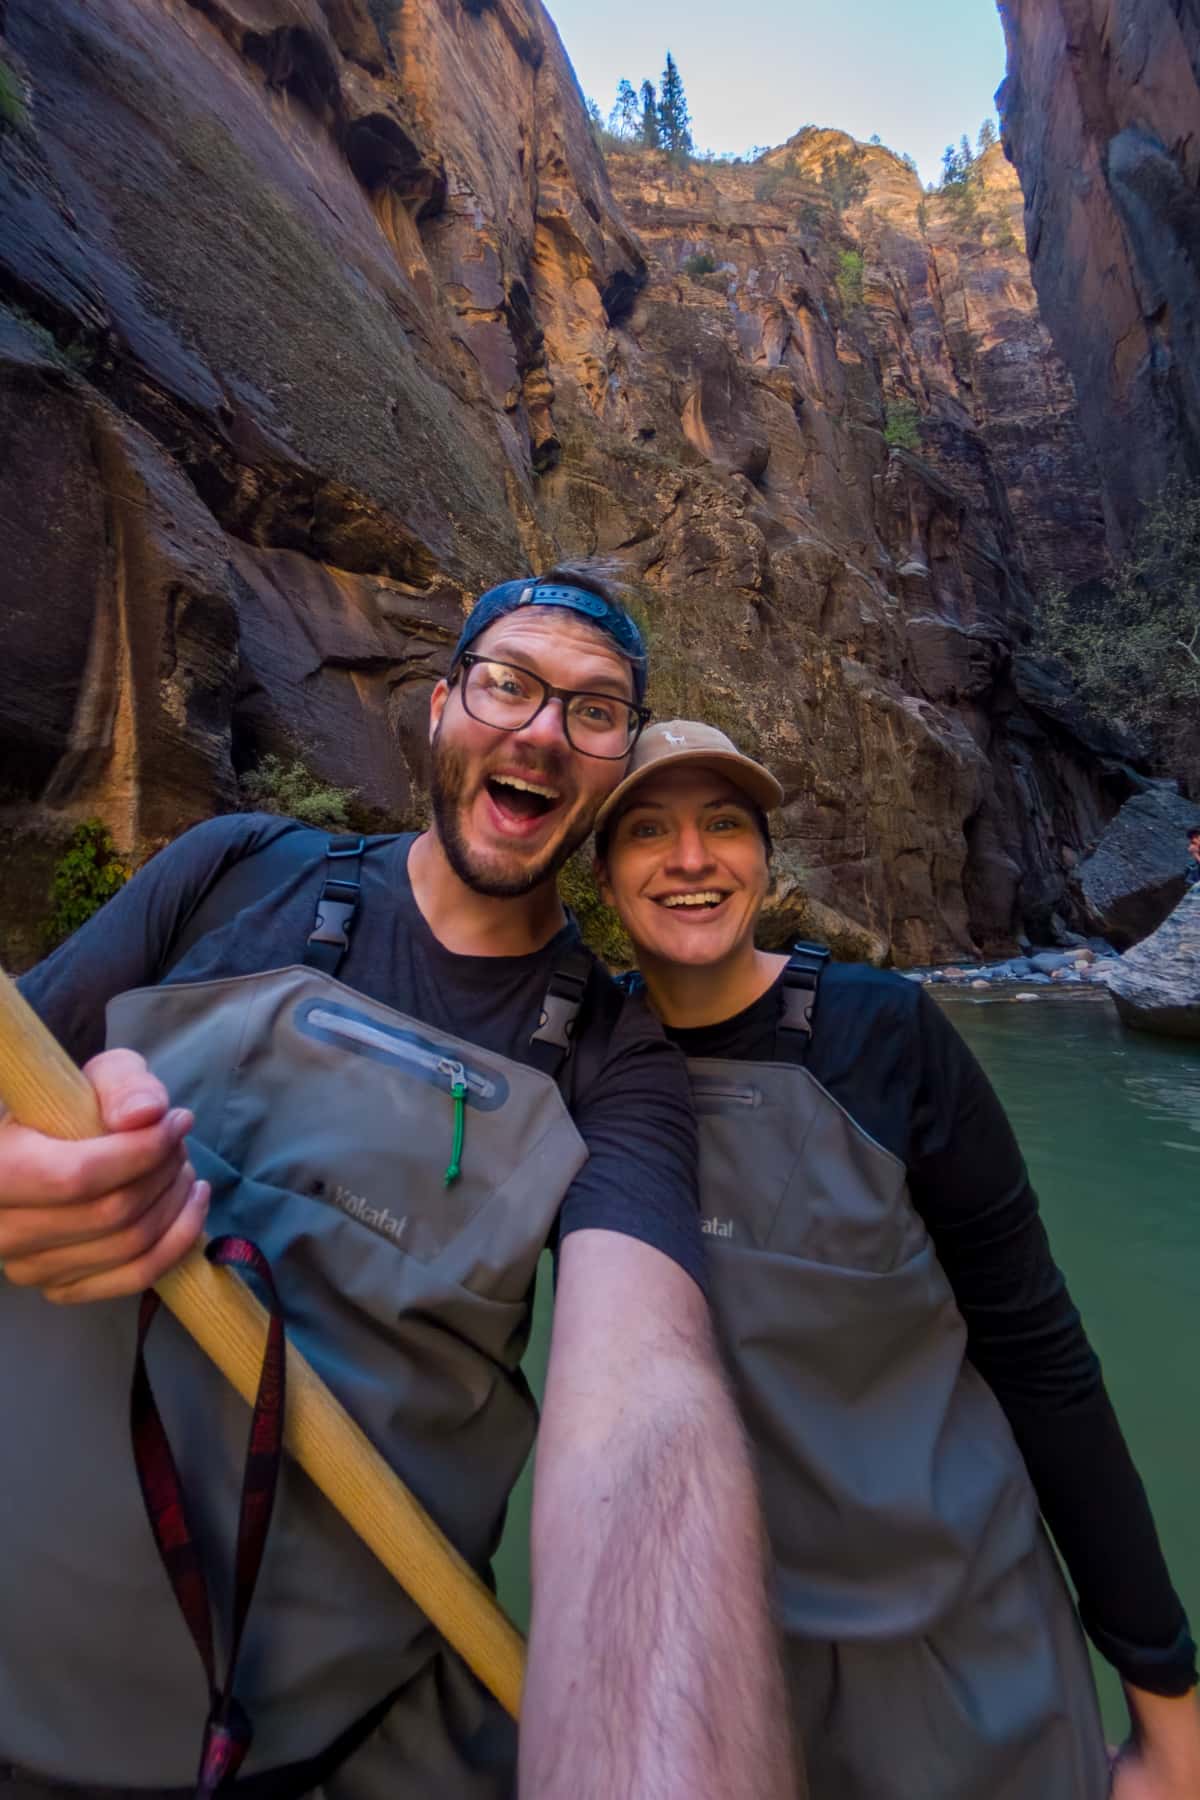
Most hikers elect to go to the Wall Street section of the hike, where the canyon walls reach 1500 feet high and the river is only 22 feet across. Since you’ll be making your way to Bryce this afternoon, I’d recommend starting this hike as early as possible (the first shuttle to the trailhead leaves at 7 AM).
Alternatively, if the Narrows is closed (as it frequently is due to unsafe water levels or flash flood risk) or hiking upstream for miles in a rushing river just doesn’t sound very vacation-y to you, pack up the car and make a slight detour on your way to Bryce Canyon, by stopping at the East Mesa Trailhead to hike to Observation Point.

The 6.7 mile, moderately challenging hike is an excellent way to say goodbye to Zion- you’ll get absolutely dazzling views straight down the canyon, with a vantage point some 600 feet higher than Angel’s Landing (it’s definitely my favorite viewpoint in the park)!
2. Drive to Bryce Canyon National Park
Next up- time to road trip from Zion to Bryce Canyon! The park is known for its unique hoodoos, these tall skinny shafts of pink and orange rock protruding from the desert floor, sometimes reaching the height of a ten-story building!

While Zion feels impossibly grand, visiting Bryce, on the other hand, feels a bit like you’ve been dropped into some sort of magical fairyland (hoodoos are actually sometimes referred to as “fairy chimneys” around the world). While I go over the highlights of the park in this article, be sure to check out my post about what to do in Bryce Canyon in one day for more details on the recommended hikes and sites to explore in the park.
3. Drive to scenic overlooks or hike the Fairyland Loop Trail
If you’re pooped from your hike earlier, consider just driving to some of the park’s best viewpoints to take in the unique vistas of colorful hoodoos- some of my favorites are Bryce Point, Inspiration Point, and Rainbow and Yovimpa Viewpoints.
Alternatively, if you’ve got some more miles left in you for the day, check out the Fairyland Loop Trail, a 7.8 mile loop trail which both walks along the rim of the canyon and dips below the rim, providing up close and personal views as the hoodoos soar overhead.
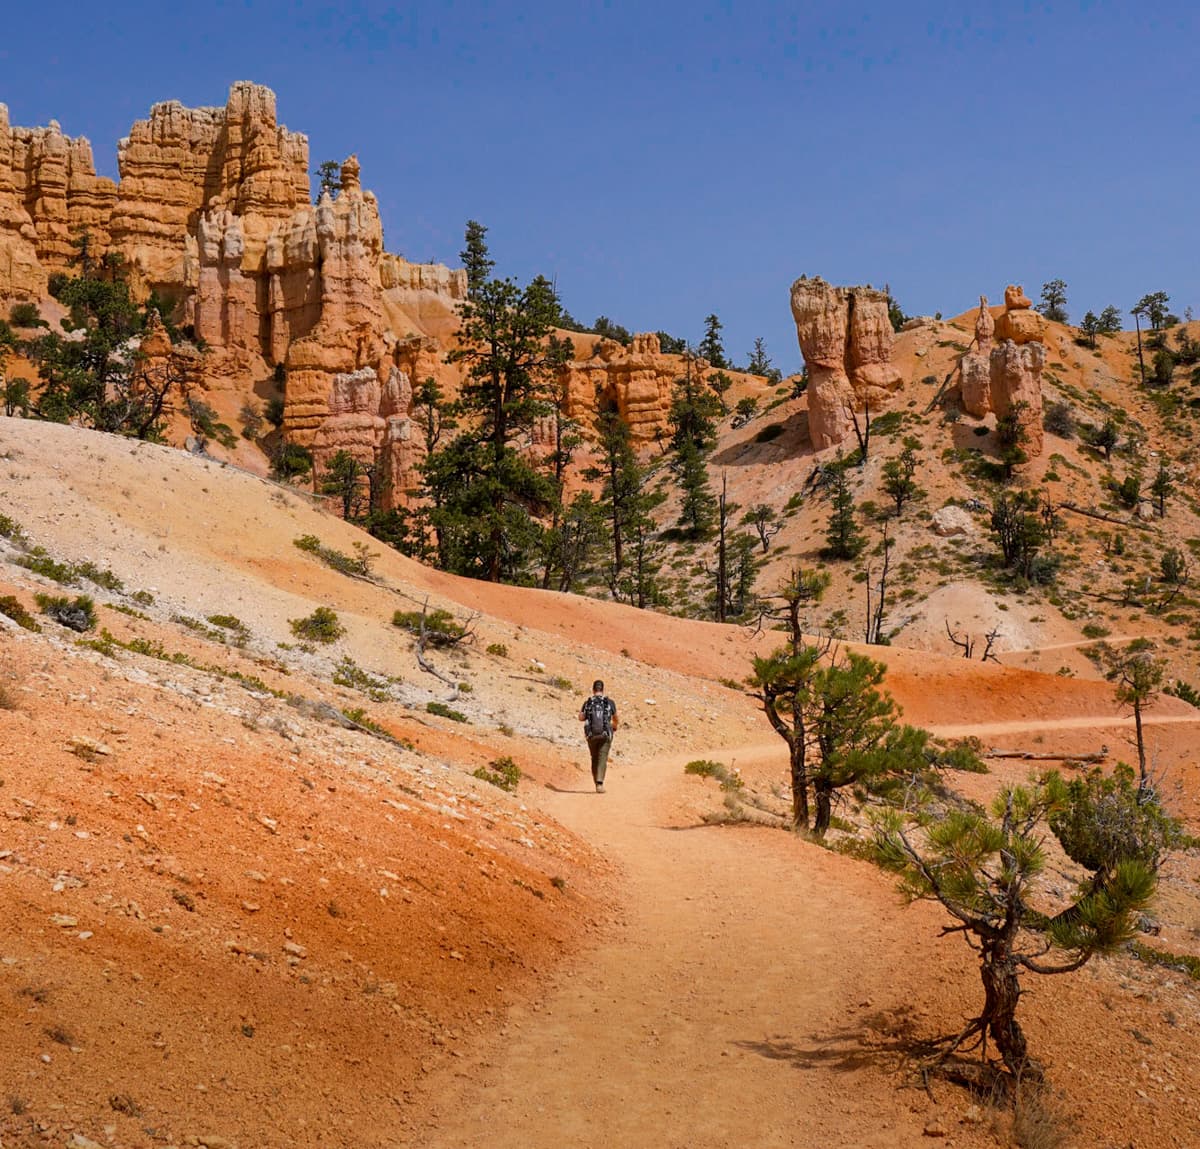
While the Fairyland Loop Trail is one of my absolute favorites hikes in the park, you can get similar views along a trail that’s approximately three miles shorter with the Peekaboo Loop Trail if you want to take it a bit easier for the afternoon.
4. Check into your hotel near Bryce Canyon
Hit the hay early- because of the direction the hoodoos face, sunset in Bryce Canyon isn’t really anything to write home about. Spoiler alert, though- sunrise in Bryce Canyon is absolutely gorgeous, so get your beauty sleep before that early morning wake-up call.
Hotels Near Bryce Canyon National Park:
- Happy Trails Bnb: Justin and I stayed here during my last trip to Bryce and I LOVED it- the owners were sweethearts and the rooms were clean and cute (and came with snacks!).
- Bryce Valley Lodging: Affordable and charming cabins, just a short 15 minute drive from the entrance of the park.
- Stone Canyon Inn: For a bougie-er experience, the Stone Canyon Inn has several individual cabins with spectacular views of the surrounding canyons, private hot tubs, and even a treehouse for rent!
Camping Near Bryce Canyon National Park:
- There’s a couple of great free dispersed camping spots nearby. Check out Tom’s Best Dispersed Camping and Whiteman Bench.
- If you’re looking for campsites with amenities, there are two campgrounds in the park itself, the North and Sunset Campground – although they have some amenities, like a dump station and flush toilets, there’s no electrical or water hookups. For my RV brethren out there who need those hookups, consider Ruby’s Inn RV Park.

Places to Eat Near Bryce Canyon:
- The Lodge at Bryce Canyon is a good option if you’re looking for a meal within the park itself- expect to pay higher prices for not stellar food, but for a convenient post-hike meal? It can’t be beat.
- If you’re looking for a nicer meal on your trip, I’d recommend stopping in the Stone Hearth Grille, which has an upscale but delightfully unstuffy atmosphere (reservations recommended).
To be honest, beyond that, I’ve been pretty underwhelmed by the food options around Bryce. Pack that cooler, friend!
Day 4: Bryce Canyon to Capitol Reef
1. Watch sunrise over Bryce Canyon
For one of the most gorgeous sunrises of your life, head to Sunset Point (counterintuitive, I know, but absolutely accurate).

2. Hike the Navajo Loop & Queen’s Garden Trail
After you’re done soaking up that golden light, head to the Navajo Loop trail, which conveniently leaves right from Sunset Point. You’ll again take switchbacks down under the colorful canyon walls.
Once you hit the bottom of the descent, instead of heading back uphill to complete the Navajo Loop, continue on to the Queen’s Garden trail (you’ll see signs pointing you in the direction of the junction of these two trails).
Along this trail, you’ll pass through several archways carved into the canyon walls and pass by unique rock formations. The full Navajo Loop and Queen’s Garden trail (starting and ending at Sunrise Point) is 2.9 miles in length and 646 feet in elevation gain.

3. Drive to Capitol Reef National Park
Time to say farewell to Bryce- and head to Capitol Reef National Park!
If you have some extra time to play around with in your Utah road itinerary, I’d recommend taking the route along UT-12 and stopping by Grand Staircase National Monument on the way for a day or so. Some cool hikes to check out there include Peek-a-boo and Spooky Gulches (two non-technical slot canyons- and with fun names!), Lower Calf Creek Falls, and Coyote Gulch. If not, file this area away on your someday bucket list. It’s epic!
As you approach Capitol Reef, you’ll be able to see the park’s amazing rock formations from miles and miles away. If you’re not familiar with Capitol Reef or its incredible landscape, the park is located along a 100-mile waterpocket fold (basically a literal wrinkle in the earth’s crust), where years of erosion have caused the colorful rocks, called “reefs”, to be on display.

What’s left behind from this process is gorgeously vibrant natural bridges, canyons, and other stunning rock formations for you to explore! If you want a more detailed guide to the park, check out our guide to one day in Capitol Reef.
4. Hike the Hickman Bridge Trail
If you’re ready to stretch your legs some, drive to the Hickman Bridge Trailhead. This moderate 1.8 mile out-and-back trail is an excellent introduction to the park, taking you to a stunning viewpoint overlooking Capitol Reef and ends with a view below the Hickman Bridge, soaring 300 feet overhead.
5. Cruise along the Scenic Drive
Afterwards, blast that A/C and take the Scenic Drive, a 7.9 mile drive along Capitol Reef’s most stunning scenery, including exposed rocks and even petroglyphs.

6. Watch sunset at Sunset Point
End the day by timing your visit to Sunset Point with, well, sunset, an easy 0.8 mile out-and-back hike to the overlook. It’s the perfect place to watch the orange glow of the desert sun dance on the red canyon walls.
Hotels Near Capitol Reef:
- Austin’s Chuckwagon Motel: A charming lodge with lots of quaint vibes and a well-stocked general store.
- Skyridge Inn Bed and Breakfast: This bed and breakfast provides beautiful views of the surrounding landscape and certain rooms come with their own private balconies or even hot tubs! Yes please.
- Red Sands Hotel: Clean, spacious rooms with a pool and hot tub overlooking a bucolic cow pasture.
Camping Near Capitol Reef:
- For free dispersed camping options that are within close proximity to the park, consider Capitol Reef East Dispersed Camping and Pleasant Creek Dispersed Camping.
- If amenities are more your thing, Capitol Reef offers one developed campground (i.e., with fancy flush toilets, but no showers), the Fruita Campground, which costs $20 per night. For full hook-ups, check out Wonderland RV Park, which has fantastic reviews.

Places to Eat Near Capitol Reef:
- While not the most substantive meal, the Gifford Homestead in Fruita, an adorable historic Mormon settlement in the park itself, has a cute selection of locally made artisan crafts and goodies, like homemade jelly, cinnamon rolls, and pies. If you visit in season, you can also hand pick all kinds of fruits and even nuts from the settlement’s orchards. Be sure to bring cash!
- Try Chak Balam Mexican Restaurant for lowkey vibes and awesome Mexican food.
- If you’ve got a hankering for a burger and fries (I feel you, dude), stop by Capitol Burger Food Truck.
Day 5: Capitol Reef to Moab
1. Hike the Cassidy Arch Trail to watch sunrise
First things first, start off your day with one of the most unique hikes I’ve ever been on, the Cassidy Arch Trail (if you’re a go-getter, sunrises here are GORGEOUS!).
If you’re only going to do one hike at Capitol Reef, I’d make it this. We liked this trail SO much, we actually hiked it twice! Over the course of one and a half miles (three miles roundtrip), you’ll climb 666 feet above the Scenic Drive to the top of the arch itself.

Unlike most natural arches, you can actually walk across the top of this one, which is about 20 feet wide in most sections, so it’s manageable for even my acrophobic friends.
2. Hike the Chimney Rock Loop Trail
If you’re ready for one last hike in Capitol Reef, head to Chimney Rock Loop Trail, a 3.3 mile moderate loop trail that will provide you with fantastic vistas of Fruita and the waterpocket fold below.
3. Drive to Moab
Hit the road again for your final destination on your Utah road trip- Moab, home of both Arches and Canyonlands National Parks!
Moab is soooo cute- it’s a tiny town, surrounded by soaring red rock walls, with some REAL hardcore hippie vibes. My first dining experience in Moab was at a donations-based, all vegan food truck, where there was a mini-drum circle and the majority of the clientele were barefoot. So, yeah, pretty darn crunchy!

I’d recommend taking the afternoon to explore the city. Grab a beer at Moab Brewery or peruse some of the cute shops in town like Moab Made, The T-Shirt Shop, and Back of Beyond Bookstore.
4. Watch sunset at Dead Horse Point State Park
In the late afternoon, make your way to Dead Horse Point State Park. The eponymous viewpoint in the park is a narrow neck of land, with soaring cliffs in every direction and Canyonlands National Park in the distance.
Note, though, that it’s a Utah state park (and thus, is not covered under the America the Beautiful Pass) and charges $20 per vehicle. Thankfully, though, sunset here is absolutely EPIC (and worth the $20, in my opinion!).
Hotels in Moab:
Moab’s cuteness can come with some sticker shock. Even traditionally cheap hotels, like Motel 8, can cost upwards of $180 a night here! So if you’re looking for affordable rates, be sure to book early.
- Aarchway Inn: This hotel is fairly affordable; is close to both Arches and Canyonlands, and has a nice pool to cool off during the day.
- Gonzo Inn: A boutique hotel that leans in hard to the Southwestern aesthetic.
- Hyatt Place Moab: One of the swankiest options in town, with a gorgeous pool overlooking Moab’s soaring canyons, free laundry services, and private breakfast nooks for you to partake in your continental breakfast.

Camping in Moab:
- There’s a ton of great free campsites close to Moab on Bureau of Land Management land, like Lockhart Road Dispersed Camping and Lone Mesa Campground.
- If you’re an RVer looking for hook-ups, there’s, of course, a decent number of RV parks around (ranging from about $40-$90+ a night), like Dead Horse Point State Park and Sun Outdoors Arches Gateway.
Places to Eat in Moab:
- 98 Center: Fun Vietnamese fusion options. Banh mi nachos? ‘Nuff said.
- Moab Garage Co.: A trendy cafe offering unique takes on lunch fare, like a deep-fried peanut butter and jelly sandwich.
- Love Muffin Cafe: Casual restaurant dishing up sandwiches with fresh and homemade ingredients.
Day 6: Arches National Park
1. Hike the Devil’s Garden Trail
Welcome to Arches National Park, known for its picturesque natural stone arches amongst Moab’s red rocks.
Head first to the Devil’s Garden trail, which is another choose-your-own-adventure kind of trail.

You can elect to hike up to 7.9 miles to see each of the seven different arches along the trail (going counterclockwise starting at the trailhead, there’s Landscape, Partition, Navajo, Double O, Private, Pine Tree, and Tunnel Arches). If you’re instead looking for something a little more chill, you can just hike 1.9 miles to the Landscape Arch, believed to be the longest natural stone archway in the world!
Depending on which arches you decide to hike to, this can be an out-and-back trail or, if you want to hit all of them, a loop (to see an interactive map of the trail, check the National Park Service’s website).
2. Cruise the Arches Scenic Drive
Crank the A/C and cruise down the 18-mile Arches Scenic Drive. Some places worth making a pit stop along the way: Sand Dune Arch, Fiery Furnaces Viewpoint, Balanced Rock, and Park Avenue.
3. Hike the Windows Loop and Double Arch Trail
Drive to the Windows District, one of the largest concentrations of arches in the park. In just an easy 2.1 miles, you’ll be able to see up to seven different arches along the trail, in addition to other spectacular rock formations.
This is actually two different hikes (the Windows Loop and Double Arch), but both trailheads are located in close proximity to the Windows’ parking lot.

Start on the Windows side, where you’ll stroll to the North Window, Turret Arch, and South Window, each beautiful in its own way. Once the loop takes you back into the parking lot, continue along counterclockwise to the Double Arch trail.
This is one of the most unique features in the park, with two arches, closely positioned together, forming a beautiful open amphitheater.
4. Watch sunset and stargaze at Delicate Arch
End your day with a bang at Delicate Arch, one of, if not the most, iconic arches in the world. The hike to the base of the arch is a moderate to challenging 3.2 mile out-and-back trail.

While this hike, especially at sunset, is extremely popular, the colors of the desert sky are well worth the crowds- so bring along a blanket and some sandwiches to settle in and enjoy the view! If you’re over hiking for the day, you can instead choose to go to two viewpoints from the parking lot to see the arch- a lower viewpoint. requiring a 50-yard walk, or an upper viewpoint, along a moderately steep 0.7 mile out-and-back trail.
For more details on its best hikes and overlooks, we've written a whole guide with everything you need to know to explore Arches National Park in one day.
Day 7: Canyonlands National Park and back to Vegas
1. Watch sunrise at the Mesa Arch Trail
On your final day of the road trip, you’ll spend the morning enjoying Canyonlands National Park, known for its expansive canyon views and rugged desert scenery. Pack up your car, check out of your accommodations, and make your way from Moab to Canyonlands.
The park is huge (227,598 acres, to be exact), boasting four distinct districts (Island in the Sky, the Needles, the Maze, and the Green and Colorado Rivers)- so given your limited time in the park, I’d suggest just concentrating on Island in the Sky, due to its accessibility, stellar views, and short hiking trails.

First on the agenda is the Mesa Arch Trail, a flat, 0.7 mile loop trail (more akin to walk) to a sandstone arch on a cliff’s edge, artfully framing the unique red rock formations scattered across the desert floor below. For an hour or so after sunrise, the rising sun famously hits the bottom of the arch, turning the stone a fiery red color, so if you can time your visit in that window, I’d highly recommend it!
3. Stop at Canyonlands’ best scenic overlooks
Do a lightning round of some of the best viewpoints in the park-Grand View Point, Buck Canyon Overlook, and Green River Overlook. While each provides unique vantage points of the park’s stunning landscape, they all demonstrate why this area is called “Island in the Sky”- taking you out on to the rim of a mesa that floats some 1,000 feet above the desert floor below.

4. Hike the Upheaval Dome Trail
If you have time to squeeze in one last hike, head north to Upheaval Dome, a three-mile wide 1,000 foot crater of puzzling origins.
The beginnings of the crater are hotly debated- with some scientists arguing that the formation was caused by a meteorite impacting the Earth approximately 60 million years ago, with another school believing that a salty dome pushed its way through the sandstone rock. Regardless of the crater’s origins, you can access it along a fairly easy 1.3 mile out-and-back trail.
5. Stop at the Shafer Trail Viewpoint
As you make your way out of the park, be sure to stop at the Shafer Trail Viewpoint, which overlooks the iconic Shafer Canyon Road. This 18-mile dirt road, only accessible with 4x4s, famously has nail-biting steep switchbacks from the rim of the mesa down to the canyon floor below.

To drive on it, you need a special permit and you sadly likely won’t have time during this road trip- but add it to your bucket list for your next Utah road trip!
6. Drive back to Las Vegas
Make the drive back to the fabulous neon lights of Las Vegas.
As mentioned above, if you happen to have a couple extra days to play around with and are interested in exploring Vegas, I think spending a few days here might be the perfect juxtaposition against the frenetic pace of the road trip to the National Parks in Utah.
Some quick recommendations of things to see and do around Vegas:
Neon Boneyard
Check out the Neon Boneyard for a glimpse into Vegas’s history, with hundreds of neon signs from casinos past and present. Time your visit right before sunset so you can watch as the signs flicker to life.

Fremont Street
Make a stop at Fremont Street– i.e., the “old” Vegas- to watch the street performers, check out some of the older casinos and their quirky sites (like the biggest gold nugget in existence at the Golden Nugget or the pyramid of $1,000,000 at Binion’s) and the trippy, overhead lights display that runs several blocks along Fremont Street.

Check out the natural beauty surrounding Las Vegas
If you’re only interested in seeing natural beauty on your trip, good news- Vegas is surrounded by surprisingly beautiful parks. Consider:
- Red Rock Canyon is a quick half hour drive from the Strip and provides beautiful views of dramatic canyons and soaring orange cliffs- two must-do hikes are Calico Tanks and Ice Box Canyon Trail.
- A little over 45 minutes away from the Strip is the out-of-this world Valley of Fire State Park, which is 10/10 worth a stop for its orange, pink, and red hued rock formations. A few great hikes there are the Fire Wave Trail, Pink Canyon, and White Domes.
- The Emerald Cave is a cavern, carved into the wall of a red rock canyon by the rushing waters of the Colorado River. It gets its name from the glittering green color of the cave’s waters in the sunlight. The only way to get to this cave is by kayaking five miles (roundtrip) down the beautiful Colorado River, where, with any luck, you’ll spot bald eagles and bighorn sheep along the way. We just went on this tour to the Emerald Cave and it quickly became our favorite daytrip from Vegas!

Hotels in Las Vegas:
All of these have lovely rooftop pools and spectacular views of the Strip, which is clearly how I judge Vegas hotels.
If you’re looking to save some money, I LOVE the Jockey Club, an older resort that’s one of Las Vegas’s best hidden gems (it’s super affordable and hidden right next to the Bellagio fountains). In fact, I wrote a whole article about exactly why the Jockey Club is one of the best places to stay in Vegas!
Camping in Vegas:
- Although a bit of a drive from the Strip, Government Wash Dispersed Camping is a great free option that’s reasonably close to Vegas and overlooks Lake Mead.
- For closer proximity to Vegas, there’s some decent RV resorts, like the Las Vegas KOA Journey at Sam’s Town and Las Vegas RV Resort.
Places to eat in Vegas:
- Beauty and Essex: If you’re feeling a date night out, this upscale restaurant, with sexy speakeasy vibes, can’t be beat.
- Lotus of Siam: Renowned as one of the best Thai restaurants outside of Thailand. Seriously- it’s Anthony Bourdain approved so you know it’s good.
- Good Pie: Dishing up a style they curiously call “grandma pizza”, this off-the-Strip joint dishes up some of the most delicious slices in Sin City, perfect for curing even the worst of Vegas hangovers.
Tips for a Road Trip to the Mighty Five
Book your accommodations well in advance
The national parks in Utah are POPULAR.
Unless you’re visiting the Mighty Five in the dead of winter, the limited accommodations in the small towns that neighbor the national parks, especially the affordable ones, can book up WAY in advance.

Budget enough drive time
One thing that drives me a bit crazy about a lot of road trip itineraries is that they frequently do not account for the actual time to drive between the destinations.
Be sure to budget PLENTY of drive time in your daily schedule- between gas and bathroom breaks, stopping at interesting roadside stops along the way, and actually, you know, driving, it can take a lot longer than the actual time than Google Map indicates.
Plan driving between parks in the middle of the day
I’d recommend (and have set up the suggested itinerary above) planning to drive in the middle of the day, when the Utah sun is at its very hottest.
This way you can still hike and explore the parks during the coolest parts of the day and, if you’re crazy like me, still catch both a sunset and a sunrise at each park!
Get to the parks early
I’d highly recommend getting to the parks early (like, 7 am or earlier, early). You’ll get the best parking, the trails will be mostly empty and quiet, and the temperature won’t be oppressive.
Zion, Capitol Reef, and Canyonlands are hard to see in one day
If you’re one of those lucky folks who can swing more than a week off at a time (hi- can I be you?), the best national parks in Utah to dedicate an extra day or two are Zion, Capitol Reef, and Canyonlands, in that order.
While you could easily spend MONTHS exploring each of the Big 5 National Parks in Utah, you can definitely squeeze in most of the main sites at Bryce and Arches in just one day each. The other parks are much more spread out, with disparate sections that can take hours to drive between.
So while you can definitely get a great sampling of Zion, Capitol Reef, or Canyonlands in just a day, you should dedicate a bit more time to each of them if you can afford to.
What to pack for a road trip to Utah’s National Parks
Your packing list for a Utah road trip is obviously going to depend upon what time of year you visit and the activities that you’re going to do along the way.
Sun protection
During the warmer months, the sun and heat can get quite intense in Utah (we visited in September and it exceeded 100°F a couple of days while we were there), so, for protection, I’d recommend packing sunglasses, sunscreen with UVA and UVB protection, and a hat.
Layers
No matter what time of year you visit, it can get pretty chilly in Utah when the sun goes down. Since I strongly recommend you start your adventures in the national parks early (both to avoid the crazy crowds and the heat), you should definitely bring along warm layers, like a cozy beanie orf leece pullover that can easily be tossed in your hiking backpack.
If you’re visiting in the wintertime, you should definitely pack some heavier outerwear options, like this packable jacket from North Face for women or men.

Reusable water bottle
Did I mention it can get pretty steamy during the day in Utah, especially in the summertime? There’s something about the desert climate that seemingly just sucks all moisture right out of your body. Be sure to stay hydrated and be a friend to our planet by bringing along a big reusable water bottle.
Justin and I also keep a refillable jug of water in our car so that we can refill our individual bottles between hikes. After spending way too much money and creating way too much waste with disposable water bottles, these two purchases have been gamechangers.
Hiking shoes
Most of the hikes in Utah’s national parks are through sandy or rocky trails or on solid sandstone. For the best traction in this kind of hiking environment, be sure to bring hiking shoes, as opposed to flip-flops, Converse, or other questionable footwear choices- you can go with a pair of hiking boots (Justin has had these boots for years and here‘s the pair I use) or some hiking sandals, like the beloved Tevas (women’s or men’s) or Chaco’s (women’s or men’s) .
A cooler
Restaurants and cafes in the national parks can be a convenient place to pick up a meal, but more often than not, can be crowded and expensive, with lackluster food. And for some of the parks, it won’t be very convenient to leave the park to pick up a meal in the middle of the day from a neighboring town- between factors like distance or traffic, it could literally detract hours from your already limited time there.
Instead, if you’re roadtripping to the parks from home, I’d highly recommend packing a cooler (we have one like this and use it all the time for road trips!) to keep in your car with some meals and snacks to cut down on costs and wasted time.
Headlamp
Several of the national parks in Utah are designated as an International Dark Sky Park and thus, offer some of the most spectacular stargazing opportunities in the world.
To be able to get to and back from your stargazing spots safely, I’d recommend bringing along a headlamp. We have these rechargeable ones, which are awesome since they came in a pack of two and we never have to worry about carrying around extra batteries since we always carry our travel battery bank with us!

America the Beautiful Pass
If you paid for entrance fees for each of the parks during your trip, you’d wind up paying $150.
Instead, you can pick up an America the Beautiful Pass, an annual pass that costs just $80 if you’re a U.S. residents ($250 for non-U.S. residents) and gets you into the Utah Mighty 5, in addition to more than 2,000 U.S. National Parks, forests, shorelines and more!
The proceeds support the National Park Service and since you’ll be saving almost 50% on entrance fees (and get to visit other U.S. National Parks for free!), picking one up should be a no brainer. You can pick one up here.
There’s everything you need to know about planning the absolute best road trip to Utah’s national parks. Have you done this trip? Any tips or hidden gems along the way I missed (I’m sure of it- Utah is an epically magical place!). Let me know in the comments below!


Thank you for reading our post! Check out our latest stories here and follow us on Instagram (@UprootedTraveler), YouTube, or on Facebook to see what we’re up to next!
