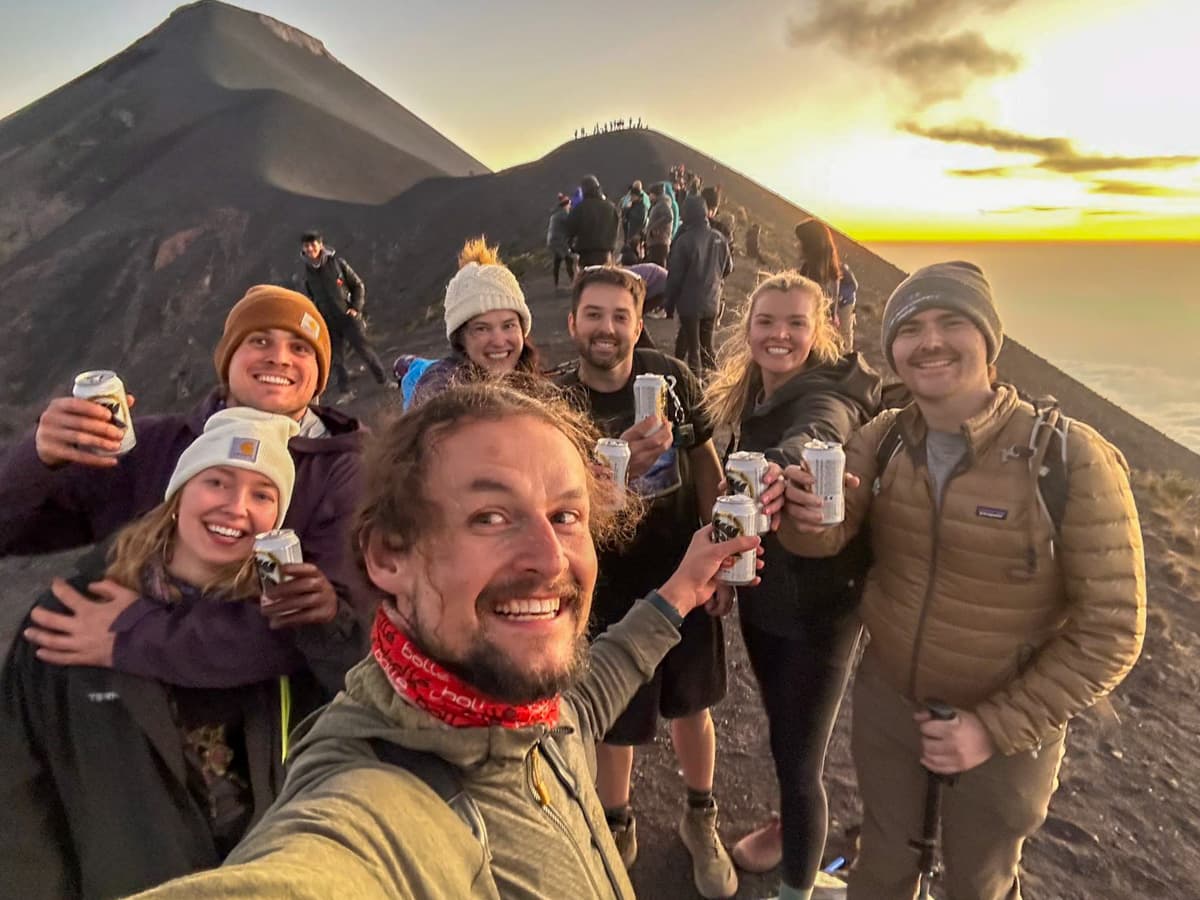
The Acatenango hike is inarguably one of the best treks in Guatemala—and arguably, the planet! On this incredible trail, you’ll hike up a 13,000 foot active volcano and watch the neighboring Fuego Volcano spew molten lava into the air every 15 to 20 minutes. And yes, it’s truly as insane as it sounds!
It’s also not exactly a trail that you should just stroll up to and casually start climbing. Between the summit’s staggering elevation, the challenging terrain, and precarious weather conditions, there’s a LOT to know before hitting the old dusty trail and checking this awesome hike off your bucket list. So here’s everything you need to know about the Acatenango hike, the most epic trail in Guatemala.
This post may contain affiliate links. If you make a purchase through them, we may receive a small commission, for which we are extremely grateful, at no extra cost to you.

")
About the Acatenango Hike
Length
8.5 miles (13.7 km)
Elevation gain
5,269 feet (1,606 meters)—yup, you’ll gain a full vertical mile on this hike!
Difficulty
Challenging.
Like, really, really hard—during most of the hike, you’re climbing at over 10,000 feet of elevation, where the air is thin; the elevation gain is INTENSE, to say the least; and you’re climbing up crumbly volcanic sand the entire time. I would consider myself a pretty advanced hiker and this trail absolutely kicked my butt.

That being said, I saw people of all shapes, sizes, and ages hiking this trail. And, although we’re pretty experienced hikers, my husband, Justin, and I hadn’t really hiked (…or exercised at all) for four months before hiking Acatenango—and we made it just fine!
So most people in decent shape should be able to do this hike—just be prepared to get a proper workout!
Permit
You don’t specifically need a permit to hike this trail, but you are required to go with a guide (more on that below) and pay an entrance fee of Q100 to get into Acatenango National Park.

Note that the vast majority of paid guided tours do not include the entrance fee, so be sure to bring along plenty of Quetzales to buy your ticket! Credit cards aren’t accepted anywhere along the trail.
Psst... before lacing up those hiking boots, be sure to follow these key safety hiking tips that you need to know before hitting the trail!
What is the Acatenango Hike?
There are a variety of different tours and itineraries for enjoying this unique trail, but the general format of the hike is approximately the same.
The hike usually takes two days.
On day one, you’ll transfer from Antigua to the small town of La Soledad, near the base of Acatenango near the national park.
From here, you’ll make the hike up to your tour group’s base camp (more on the actual hike below!), where there’s usually rustic accommodations that you’ll stay in overnight to help protect you against the wind and the cold.

The tour group that we went with had several plywood A-frame shelters, with yoga mats and sleeping bags inside, but we also passed other operators’ camps with regular ol’ tents.
Operators’ base camps usually (but not always) have awesome views of the Fuego Volcano regularly erupting, just 1.5 miles away.
Once you reach base camp, you’ll have the option to add on an additional challenging hike up the slope of Fuego, so you can watch the sunset while getting a VERY up close and personal view of the volcano’s erupting lava.
Alternatively, if you opt out of this additional hike, there’s a short hike from most operator’s base camp to an overlook where you can watch as the sun sets over Fuego.
Regardless of which members of your group did the additional hike to Fuego, everyone meets back up at base camp to eat dinner and chat around a campfire, with Fuego’s eruptions serving as a spectacular backdrop.
Depending on the weather, your guides will either lead the group up to the summit of Acatenango at sunset or, more typically, at sunrise on day two. After watching the sunrise, you’ll hike back down the volcano and head back to Antigua.
How to get to the Acatenango hike
As noted above, you are required to have a guide on the trail. Accordingly, almost everyone visits Acatenango as part of a guided tour.
On the first day of your journey, you’ll meet up at the operator’s office or, sometimes, a public place, like a coffee shop in Antigua or Guatemala City. For example, our tour met up in the main square of Antigua.
From your meeting spot, you’ll take a private shuttle for a little over an hour to La Soledad.

Depending on whether your tour operator has an office in Antigua or La Soledad, you’ll usually have the ability to rent any necessary gear, like trekking poles, gloves, and hiking backpacks, either before or after the shuttle ride.
There’s a number of tour companies to choose from, which generally cost about $90-150 per person.
Tour companies from Antigua
Tours / Activities SA (T&ASA)
- Includes: basic accommodations (A-frame shelters, sleeping pads, and sleeping bags); lunch and dinner on the first day and breakfast on the second day; hot cocoa and coffee; roundtrip transportation from Antigua; and bilingual guides
We personally booked our tour through this company. It had pretty solid reviews on Viator and, if I’m being completely honest, many of the other operators we were considering were already sold out for the dates we were looking at.
This is new-ish tour operator in Guatemala and we had some initial challenges contacting them with questions about the hike before our tour. So to be honest, I was a bit worried about what our experience on the trail was going to be like.

Luckily, it turned out AWESOME. They had quality gear available to rent for a nominal fee; our guides were absolutely incredible (they actually helped me carry my water up the volcano, because I was having such a hard time!); kept everyone in high spirits during our slog uphill; and they turned out to have the base camp with the BEST view of the volcano.
Plus, there’s no more than 12 people per group, which is TEENY TINY compared to some of the more massive (like, 40+ people!) tour groups.
This might not seem like that big of a deal, but it actually has a HUGE impact on your experience while hiking Acatenango.
Since tour groups hike as one big unit, the larger group that you have, the wider the disparity in hiking abilities—i.e., if you’re a fast hiker, you’ll have to keep stopping and waiting for the slow pokes in your group or, if you’re a slower hiker (*sheepishly raises hand*), you’ll have the pressure of a HUGE group of people waiting on you as you slog up the mountain as fast as you can.
There were only nine people in our group and it was really fun being part of such a small “team” and getting to know everyone, from around the world, during our adventure!
CA Travelers
- Includes: basic accommodations (cabins, sleeping pads, and sleeping bags); breakfast, lunch, and dinner on the first day, and breakfast on the second day; gear rentals; transportation to and from Antigua; and bilingual guides
CA Travelers is one of the best operators guiding tours to Acatenango. It feels like they anticipate hikers’ needs—for example, I love that they automatically provide hiking rental gear in the package price and their cabins are a bit less rustic than other operators’ offerings.

The guides are incredible and tend to be a bit more proficient at speaking English than other guiding companies. I also think it’s really cool that CA Travelers donates a portion of its profits to the schools of San Jose Calderas, a neighboring community.
The one significant downside of this operator is that their tours can be quite large, with up to 30 hikers per group. Accordingly, if you’re looking for a more intimate experience, I’d recommend going with T&ASA instead.

Insider tip: While this trail is typically hiked over two days, you can find guided tours that will take you here as a day hike from Antigua, like this option.

If you’re absolutely DYING to do this trail and simply can’t squeeze in an overnight camping trip here, Acatenango can definitely be accomplished as a day hike. However, I REALLY wouldn’t recommend it.

It would be a LOT of tough hiking for a limited amount of time to actually get to see Fuego AND you would be missing seeing it at night, when you can actually see the red-hot lava explode out of the crater of the volcano.

Instead, I'd either consider taking a 4x4 tour up Acatenango or, if you’re set on hiking, heading to the less epic, but also way less grueling Pacaya Volcano trail instead, like with this tour from Antigua.
Tour from Guatemala City
There’s definitely much more limited tour operators that head to Acatenango from Guatemala City than Antigua, given that Antigua is a much more popular destination for travelers.

However, there are a handful of options, like this three day tour, which includes one day in Antigua and two days that follow the typical Acatenango itinerary, or this more traditional two day tour, directly to and from Guatemala City.
Can you go on a self-guided tour from Antigua or Guatemala City?
It’s worth noting that we encountered one dude hiking the trail without a guide. I’ve also read a few reports of other people skirting the guide requirement in various ways.
I REALLY wouldn’t recommend this.
This trail has several dangerous elements, including being at high altitude, unpredictable weather, and having slippery terrain (several people in our group fell down multiple times).
In my opinion, it’s not a great idea to be without someone who can help in an emergency circumstance (our guides were trained in first aid and one of them even served in the Guatemalan army).

Plus, you’ll have to bring all of your own equipment, including a tent, sleeping bag, and sleeping pad, which will make your pack even heavier and, this already challenging hike, much harder.
Finally, between the logistical costs of getting to La Soledad yourself—which would likely involve renting a car, as you’ll have a hard time finding a shuttle or an Uber that goes to Acatenango—and bribing whoever you’ll need to so that you can get into the park without a guide, you won’t really be saving THAT much (or possibly even any!) money.
What to Expect along the Acatenango Hike
Ascent to Base Camp
The Acatenango hike is tough, but the route itself is quite interesting, passing through four different microclimates during your climb up!
After arriving in La Soledad, you’ll start the hike up through fields of corn and beans along a SUPER steep hill of dusty, gravel-like scree.

This portion of the trail was so challenging, I literally thought I was going to throw up—and seriously considered turning around, just a few minutes into the trail. But blessedly, it’s over after about forty five minutes!
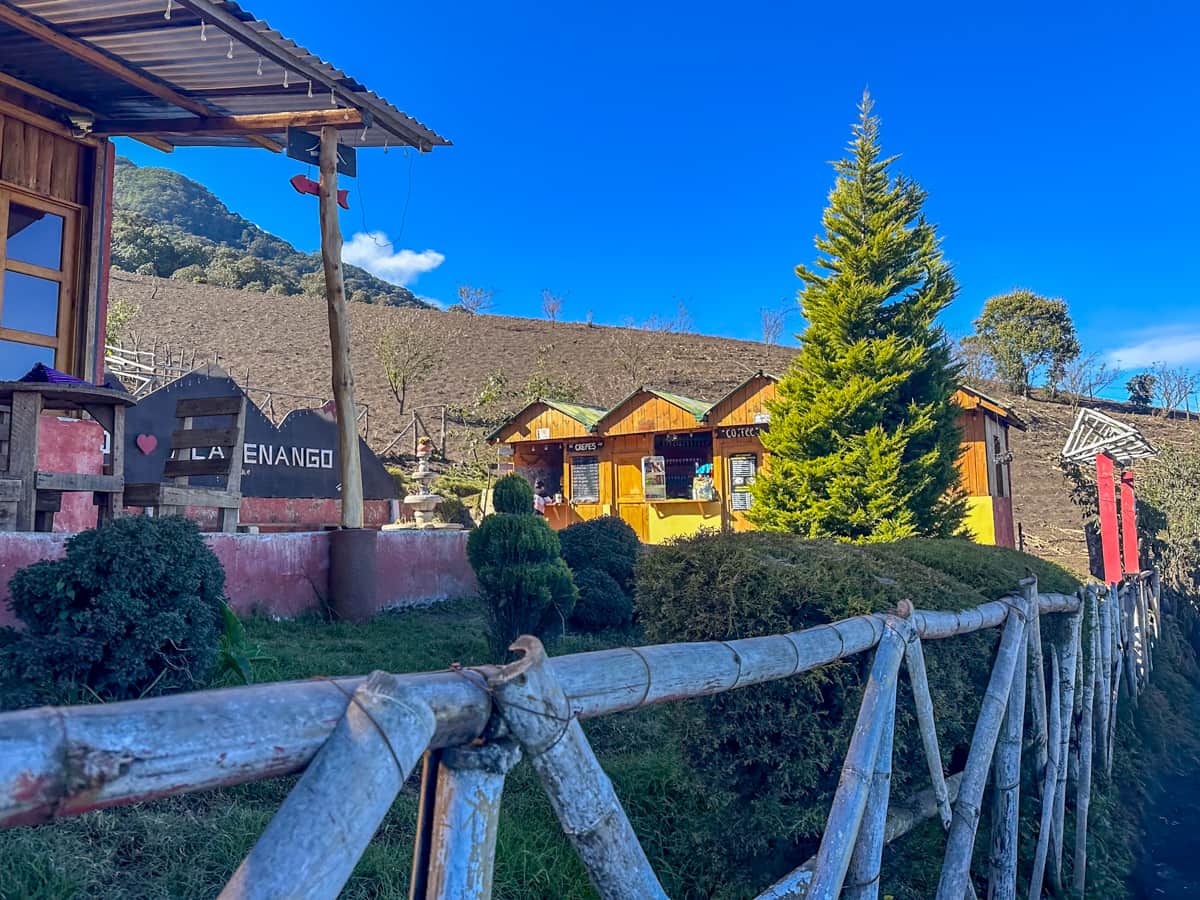
You’ll eventually reach the entrance of the national park, where there’s a small store to buy Gatorade and water.
From here, you’ll start hiking up a narrow section of stairs through more farmland that eventually gives way to a tropical cloud forest, with towering trees that drip with lush moss. Their canopy provides blessed shade from the hot Guatemalan sun and the mountain air is nice and cool—plus, while the trail is still plenty steep, the incline mellows out a bit.
As you keep climbing higher and getting closer to the treeline, the vegetation will eventually transition to a dense pine tree forest, with the incline steadily increasing again.
While the trail really is quite tough, your guides will take breaks about every half an hour or so.

And to be totally transparent, I was the slowest hiker in my group BY FAR (almost embarassingly so) and basically took breaks whenever I needed to, which was, shall we say, frequently. At least with our tour company, the guides were super patient and didn’t shame me or make me feel rushed, despite me slowing down our group a bit.
After about three hours or so from the trailhead, you’ll stop for lunch in a flat area for about an hour. Again, they’ll have water, Gatorade, beer, rum, and some snacks for sale here—and good news, the trail is a LOT easier from here on out.

Once your lunch break is over, you’ll keep climbing uphill a bit, eventually near the treeline. The trail will flatten out and you’ll finally be rewarded with views of the surrounding volcanoes, like Agua and Pacaya.
From here, you just need to make your way to your company’s base camp, which may be up a steep hill of volcanic scree (like ours was!) or along a relatively flat pathway.
Depending on your group’s fitness, it can take anywhere from three and a half to six-plus hours to get from the trailhead to basecamp (it took our group about four hours). From here, with any luck, you’ll be rewarded with views of Fuego hurling clouds of volcanic smoke and lava into the air every 20 minutes or so.
Sunset at Acatenango
You’ll usually have a couple hours to relax, settle into your rustic accommodations, and take in the views before you decide where to watch the sunset at Acatenango.
There’s a few options that your guides will offer you, depending on the weather and the conditions.
Additional hike to Fuego Volcano ridgeline
The most popular way to watch sunset is to tack on an additional trek, up to the ridgeline of the Fuego Volcano, to get a chance to see an up close and personal view of the lava. This is an additional cost to the Acatenango hike, usually around Q200 per person that needs to be paid in cash at base camp.
Estimates vary (and will depend upon where your base camp is located on Acatenango), but the trail to Fuego’s ridgeline is approximately 3.2 miles (5.1 km) and 2587 feet (789 meters) of elevation gain roundtrip. So, this portion of the hike is actually quite a bit harder than the initial climb up to basecamp.

Beyond the elevation gain, challenging terrain, and high altitude, you’ll also be hiking for half of the trail in the dark, so be sure to pack a headlamp with a decent battery life! Most tour operators do not offer or rent out headlamps.
Our guides told us the add-on hike to Fuego would take about three hours, but it actually took our group over five.
This also is the coldest part of the trek by far, so remember to bring along all of your warm layers, including hats and gloves. Our group had to turn around shortly after reaching the summit because everyone was too cold to watch Fuego erupt for longer.
In full disclosure, Justin and I didn’t feel up to hiking to Fuego and stayed back at basecamp, but the rest of our group did.
Their experience sounded a bit varied. When they initially got back from the hike, they indicated that it was even tougher than the hike up to base camp (several of them had fallen on sharp volcanic rocks and sustained minor injuries along the way), but was ultimately worth the extra effort.

But, by the time we got on the shuttle the next morning, a lot of them had changed their tune and hinted that they ultimately felt that the additional challenge wasn’t worth it.
It’s definitely up to you and how you’re feeling at base camp on whether or not you want to continue on to Fuego. Remember there’s no guarantee you’ll actually see any lava, especially if the weather is a bit iffy—but it is pretty dang cool to say that you climbed up TWO massive volcanoes in one day!
Hike to an overlook on Acatenango near base camp
Alternatively, if you don’t feel up to hiking to the volcano’s ridgeline, there’s a popular overlook on Acatenango that groups hike to from base camp to watch the unobstructed views of the sun setting over Fuego. There is no additional fee for this hike.

This is usually a MUCH shorter and less difficult trail, taking just about half an hour one way, with limited elevation gain. You’ll still be hiking back in the dark so remember to bring that headlamp!
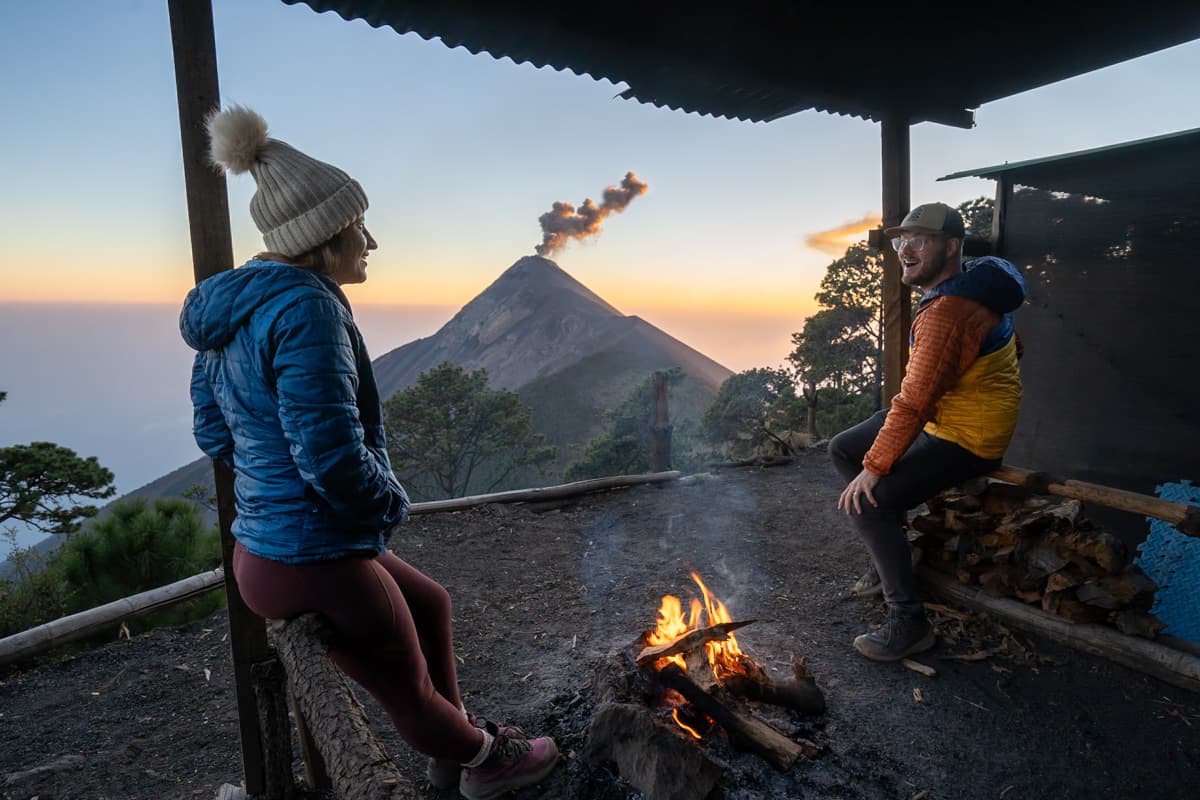
To be honest, I felt pretty lame, hanging back at our basecamp, while the rest of our group did the add-on Fuego hike. However, Justin and I had a great time, just the two of us, snuggling around the campfire, drinking some wine, and watching the sky turn into punchy colors around the erupting volcano as the sun sets. So, we have ZERO regrets for choosing this option!
Hike to the Acatenango summit to watch sunset
If the weather looks like it won’t cooperate to hike to the summit for sunrise the following morning, your guides may suggest hiking to the summit of Acatenango instead to watch the sunset.

It usually takes about an hour and a half to reach the summit, gaining about 1,000 feet of elevation up very loose volcanic scree—much like most of the hiking on Acatenango, expect this section to be really challenging.
Overnight at Acatenango Base Camp
Once you return to base camp from wherever your sunset adventures took you, your guides will usually prepare dinner for you and have a campfire going (it gets CHILLY here at night!).
Once it’s dark, you can easily see the red glow of the molten lava getting hurled into the air from Fuego, so your group will usually sit around a campfire and watch the after dinner show until your eyes just can’t stay open any longer!

The accommodations at our base camp definitely weren’t too comfy. We were essentially sleeping on thin yoga mats, without pillows, and with pretty cheap sleeping bags.
I’ve actually looked at lots of reviews for a variety of different companies and haven’t come across a tour operator where guests have raved about the comfort level of their base camp. So just be ready for an uncomfy night, bring lots of layers to protect you against the cold, and consider bringing along an inflatable pillow!
Sunrise at the summit of Acatenango
If you want to make the trek to the summit of Acatenango for sunrise and the weather cooperates, you’ll wake up (if you’re lucky enough to get any sleep—most of our group didn’t!) around 4 AM and make the climb up an additional 1,000 or so feet to the summit of Acatenango.

As mentioned above, this typically takes around an hour and a half and is one of the toughest sections of the hike, given how loose the ground is here—with every step up, you’ll essentially sink down half a step.
At the top, though, you’ll be rewarded with panoramic views of the first rays of the sun kissing not only Fuego, but the other surrounding volcanoes, the Antigua valley, and the rolling green hills of the Guatemalan highlands.

Best of all, the hike downhill only takes about twenty minutes or so. I LOVED running down the slope of the mountain, letting the crumbly ground carry my tired legs down the steep slope (be careful, of course!).
Descent from Acatenango Base Camp
After your group gets back to base camp and eats breakfast, you’ll pack up and retrace your steps down Acatenango.

I honestly thought this was going to be more challenging on my legs than going uphill, but nope—our group was able to cruise back down from base camp to the trailhead in just about two hours. Just be sure to be careful and not go too fast—several members of our group fell down multiple times on the slippery terrain.
Once you make it back to the trailhead (hopefully, in one piece), you’ll be shuttled back to the meeting point in whatever city you started in.
Acatenango Hike itinerary
In a nutshell, here’s a loose example of what kind of schedule you can expect with most group tours to Acatenango.
Day 1
- 7:30 AM: Meet in Antigua and take the hour-long bus ride to La Soledad
- 9:00 AM: Attend a pre-hike briefing and rent any gear you need from your tour company.
- 10:00 AM: Begin hike
- 1:30 PM: Lunch break
- 3 PM: Arrive at base camp and relax
- 4:00 PM: Start optional.hike to the ridgeline of Fuego
- 8:00-9:00 PM: Return back to base camp and enjoy dinner around the campfire

Day 2
- 4:00 AM: Start hike to the summit of Acatenango for sunrise
- 6:15 AM: Return to base camp and eat breakfast
- 7 AM: Start descent to the trailhead
- 9:30 AM: Return rental gear in La Soledad and get on the shuttle back to Antigua
- 11 AM: Return to Antigua

What to Pack for the Acatenango hike
Hiking backpack
Be sure to bring (or double check that your tour operator has a rental for) a backpack with good back support and hip straps to help carry the weight in your pack, which will have several liters of water, food, warm clothing layers, and other personal items.
45L should generally be enough room, but double check whether your trekking company will require you to carry your tent, sleeping pad, and sleeping bag up to base camp (which is required from some of the cheaper tour operators), in which case you may need an even bigger bag.

Justin and I both made it work with our normal travel backpacks, the awesome Peak Design Travel Bag 45L, thanks to its hip straps, but our actual backcountry camping backpacks would have been MUCH more comfy.
Hiking boots
We’ve heard crazy tales of folks hiking Acatenango with nonsense shoes on, like flip flops and Chuck Taylors. If it isn’t abundantly clear by now, the Acatenango hike is HARD, with uneven, slippery terrain and steep slopes.
You absolutely need to wear actual hiking boots for proper traction and support on this challenging trail, like the ones that Justin uses or the pair that I use.
Buff
You can use this to protect your mouth from the volcanic dust. We did not bring one of these and it was a HUGE mistake. The trail was so incredibly dry and dusty that I honestly feel like I accidentally ate about three pounds of volcano dust that was blown into my mouth while hiking on the trail.
We kept in touch with a few members of our hiking group that reported difficulty breathing and a pretty nasty cough that lasted for days after, and they attributed it to breathing the dust on the trail.
If you have a history with respiratory issues (or just don’t feel like eating a bunch of volcano dust), I strongly recommend bringing along a buff.

Headlamp
You’ll need it for hiking in the dark to Fuego, to the summit, and just for walking around base camp at night. We strongly recommend bringing this safety item.
Warm layers
Due to the high altitude and windy conditions, it gets cold—as in, well below freezing—at Acatenango and Fuego, especially once the sun goes down. Your tour company will generally offer glove rentals, but you should bring your own warm layers, including a beanie, a top and bottom base layer (here’s an option for men’s tops and bottoms and here’s an option for women’s tops and bottoms), a sweatshirt or sweater, and an extra pair of socks to throw on.
For context, I typically run pretty cold and brought along two pairs of yoga pants, a T-shirt, sweatshirt, sweater, puffer jacket, beanie, and two pairs of socks. I wore all of them by the time we went to sleep, and was STILL freezing in my sleeping bag!

Backpacking pillow
Most of the camps that I’ve come across do not provide pillows. If your luggage space is limited and you’re already traveling to Guatemala with a travel pillow (e.g. the inflatable ones you’d use on a plane) that would work well too!
Sunglasses
Warm puffer jacket
Here’s an option for men and here’s an option for women.
Rain jacket
It would be TERRIBLE to be stuck in the rain in freezing cold weather, without a waterproof layer to throw on. Here’s an option for men and here’s an option for women.
Trekking poles
If I could only give you one piece of advice, it would be to use trekking poles. I literally have NEVER used trekking poles before hiking this trail, but they were so incredibly helpful to pull my tired body up the volcano.
You can rent trekking poles from almost all of the tour operators, but if you’re doing other hikes in Guatemala where trekking poles aren’t always available, like Indian Nose, you might want to consider packing your own if you have space in your checked bag.

Water
Check with your tour operator but most tours do not provide water and suggest that guests bring at least 4L of their own.
We packed some of our water in our beloved comically enormous Nalgene bottles, as well as bought some larger, disposable water bottles along the trail.
Snacks
Most of our group were still pretty hungry after our meals. You are COOKING through calories, after all!
You can find snacks, like nuts, bananas, chocolate, or apples, at most major grocery stores in Guatemala, but if you prefer specific hiking snacks, like Clif bars, I’d suggest bringing them from home, as you’ll have a hard time finding them here!

Electrolytes
Considering how physical this hike is, you may consider bringing along an electrolyte mixture that you can add to your water.
Backpacking shovel
There are a handful of (very smelly and disgusting) pit toilets along the trail on your hike up, but most of the base camps themselves do not have bathrooms to use.
If you’re someone who has to regularly go #2 during the time you’ll be at base camp, I’d suggest bringing along a backpacking shovel so that you can dig an appropriately sized hole (at least six inches deep and six inches across) and bury your waste.
Toilet paper and baggies
Similar to above, there likely will not be any toilet paper available at your base camp. Be sure to bring baggies so that you can pack your used toilet paper and any other trash you generate out with you.
We actually offered a baggie to a girl in our tour group, who said she was heading off to use the bathroom, but she didn’t take it, because it was “so gross” to carry around her used toilet paper.
Honestly, that was one of the biggest bummers about our experience on Acatenango—in our opinion, it’s WAY grosser to see a bunch of used, dirty toilet paper scattered on the ground near the base camps than it is to pack out a baggie of your own toilet paper (*insert barf emoji*).
Sunscreen
A decent amount of the hike is exposed and the UV rays feel INTENSE, given the high altitude.
Wet wipes
See comment above about eating three pounds of volcano dust. Now imagine that all over the rest of your body.

Medication
Before you leave your home country, you may want to talk to your medical provider about getting a Diamox prescription, which treats and prevents symptoms of altitude sickness, and bring along some over-the-counter pain relievers, like Tylenol.
Toothbrush and toothpaste
Cellphone
There was spotty cell service along the trail, but we still liked being able to follow along with the trail on AllTrails and, of course, getting to take photos and videos along our hike
Battery pack and charging cables
To recharge your headlamp and phone
Camera
Definitely optional, but if you want to get some stellar photos of Fuego, I’d suggest packing along your camera. We brought along our Sony A7iii and our drone and are so glad we were able to use it to capture such amazing photos and videos!

Tripod
Again, this one is very optional, but if you want to be able to get long exposure photos of lava eruptions or the starry night sky, you’ll want to bring along your tripod.
We have this carbon fiber one from Peak Design, which packs down teeny tiny and weighs less than three pounds.
Money
You’ll need cash to pay for your entrance fee to the national park, buy snacks and drinks along the way, pay for any rental gear you need and the hike to Fuego, and to tip your guides. If you plan on hiking Fuego, I’d suggest bringing along at least 650Q per person.
For example, we each spent 25Q on gloves and 50Q on pole rentals, 100Q for admission to the park, 80Q for water and Gatorade along the trail, and 150Q for tips for our guides, for a total of 405Q per person (which did not include the additional 200Q for the optional Fuego summit hike).
When to do the Acatenango Hike
The best time to do the Acatenango hike is during Guatemala’s dry period, from November through April, when you’re likely to have clear skies and unobstructed views of Fuego.

That being said, there are trips year round—but if you go outside of this window, be prepared for fickle weather and the possibility that you might make the slog up Acatenango, only to have your view be totally obscured by clouds.
Is the Acatenango hike safe?
Yes, at least 99.9% of the time.
Acatenango is over a mile and a half from Fuego, so it’s extremely unlikely that you’d be impacted by a volcanic event while you’re at base camp. And, given that Fuego is constantly monitored by scientists and volcanologists, guides would be alerted to not take hikers up to its ridgeline if it was deemed unsafe.

As far as I can tell, there have been no recorded deaths of hikers on Acatenango related to a volcanic eruption. Of course, volcanoes can be unpredictable and there’s no guarantee that something completely unexpected isn’t going to occur.
It’s important to note that a handful of hikers have died, though, on this trek, due to nasty weather and not having sufficient clothing and equipment to survive the inclement conditions. It’s reported that these hikers were not with a guide—so here’s a friendly reminder to not skirt around the guide requirement to save a few bucks!
Tips for the Acatenango Hike
Book your trip in advance
As noted above, I waited until a week before our trip to book our tour and was really disappointed to find out that my top choices were already sold out for several weeks.

Accordingly, I’d suggest booking your tour online at least a month in advance, especially if you’re visiting Guatemala during its busy season, from November through April, or have specific needs, like a tour operator that can accommodate your dietary preferences. Because our tour operator could not accommodate our vegan diet, we wound up making and carrying all of our own meals up the volcano, which was definitely not ideal.
Schedule it for the beginning of your trip
It’s not unusual for the Acatenango trek to be canceled, due to inclement weather.
So if this is a bucket list item for you, I’d suggest scheduling your trek for the beginning of your trip so that you can possibly reschedule your hike for later on during your time in Guatemala, if that becomes necessary.
Train hard
Not to beat a dead horse, but the Acatenango hike is hard, but definitely doable with some training.

I REALLY regret how out-of-shape we were before going here and know we would have had a much easier time if we had done a few hikes with some serious elevation gain in the weeks leading up to our trek.
Buy water on the trail
Water is surprisingly HEAVY. I’d actually recommend only packing some of your water along and instead, purchasing water and Gatorade at the handful of stores you’ll find along the trail.
Justin and I did exactly this and only took about two and a half liters each and purchased the rest along the trail. I’m SO glad we did this—I honestly don’t know if I could have made it to base camp with an additional ten pounds of water in my backpack.

Just be prepared to pay a premium (and reasonably so—someone else has got to hike it up with them!)—you’ll wind up paying about 30Q for a one liter bottle of water.
Please double check with your guides before doing this that you’ll have the ability to purchase water along the way—there’s no other means for refilling water along the trail, so I’d hate to give you the advice and leave you without the proper amount of water!
Get acclimated in Antigua
If you’re coming from sea level or close to it, hiking all the way to the top of Acatenango may be a shock to your system and can increase your risk for developing symptoms of altitude sickness.
Spend at least a day or so in Antigua, which sits at 5,069 feet above sea level, to help acclimate a bit to higher elevation before attempting the Acatenango hike. Plus, it’s a really beautiful city!

Wear clothes you don’t mind getting dusty
Expect that every inch of you will be caked in brownish gray dust after this hike. So even if you’re dying to bust out your cutest pair of Lululemon white yoga pants, I’d suggest leaving those at home for this one.
Leave room in your backpack for food
When you’re packing your bag, remember to leave space for your meals, which almost all tour companies require you to carry.

I’d also suggest confirming with your tour operator that you won’t be responsible for carrying your tent, sleeping pad, and mattress, given this will have a pretty significant impact on whether or not you’ll need a larger backpack or not.
Consider getting a porter
If you’re worried about being able to do the hike on your own, you might want to consider asking your trekking company for a porter, who will carry your bag for you. Prices range, but usually cost around 200Q one-way for up to 11 kilos or 250Q one-way for bags heavier than 11 kilos.
Check Fuego’s activity before booking
Fuego has been actively erupting, every 20 minutes or so, since January 2002. However, from January through May 2025, it stopped spewing lava and, instead, just emitted steam and a bit of ash every one in a while.
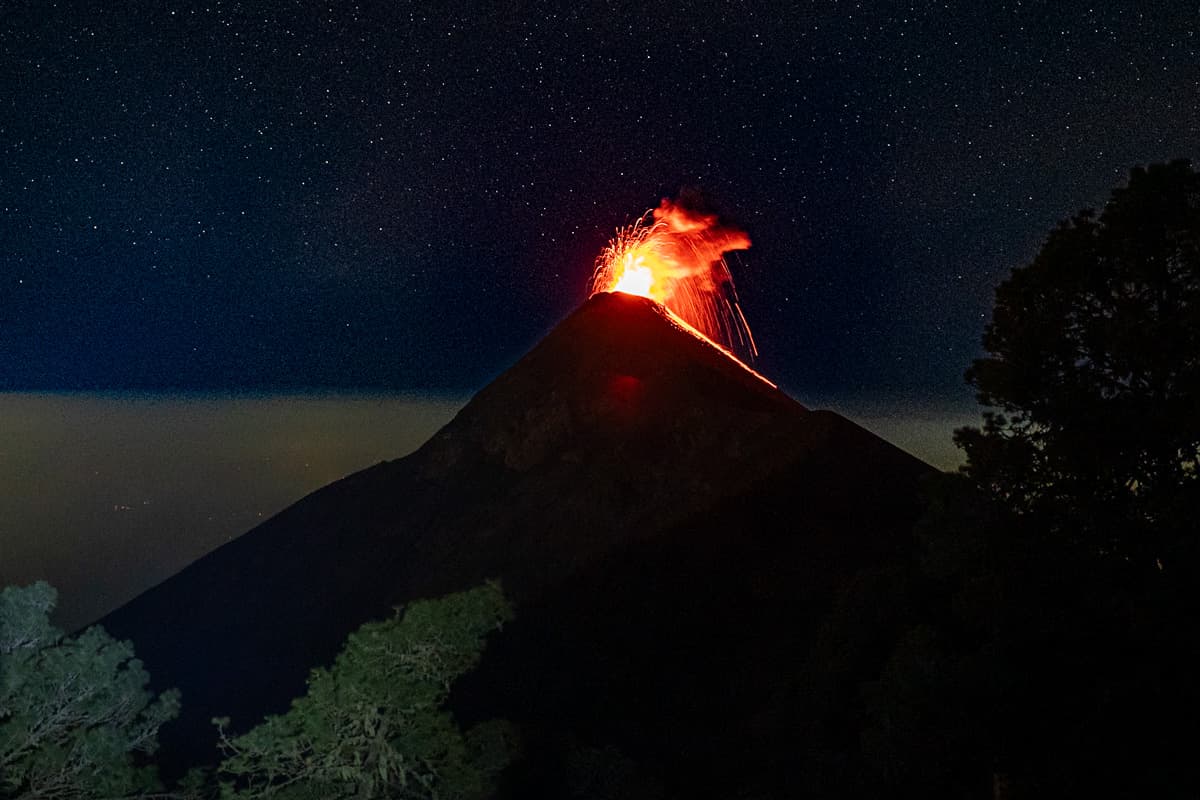
To be honest, I personally don’t think it’s worth the challenging hike up and the time commitment if Fuego isn’t actively erupting. Since May 2025, Fuego is back to putting on its spectacular nightly lava show, but it’s worth double checking before your visit to confirm the status of its eruptions.
I know that’s a LOT of information—but given we had so many questions before we hiked Acatenango, I hope this helps you feel a bit more prepared than we did. Do you have any questions about the Acatenango trek? Let us know in the comments below!
Thank you for reading our post! Check out our latest stories here and follow us on Instagram (@JustinAndJess_), YouTube, TikTok, or on Facebook to see what we’re up to next!
